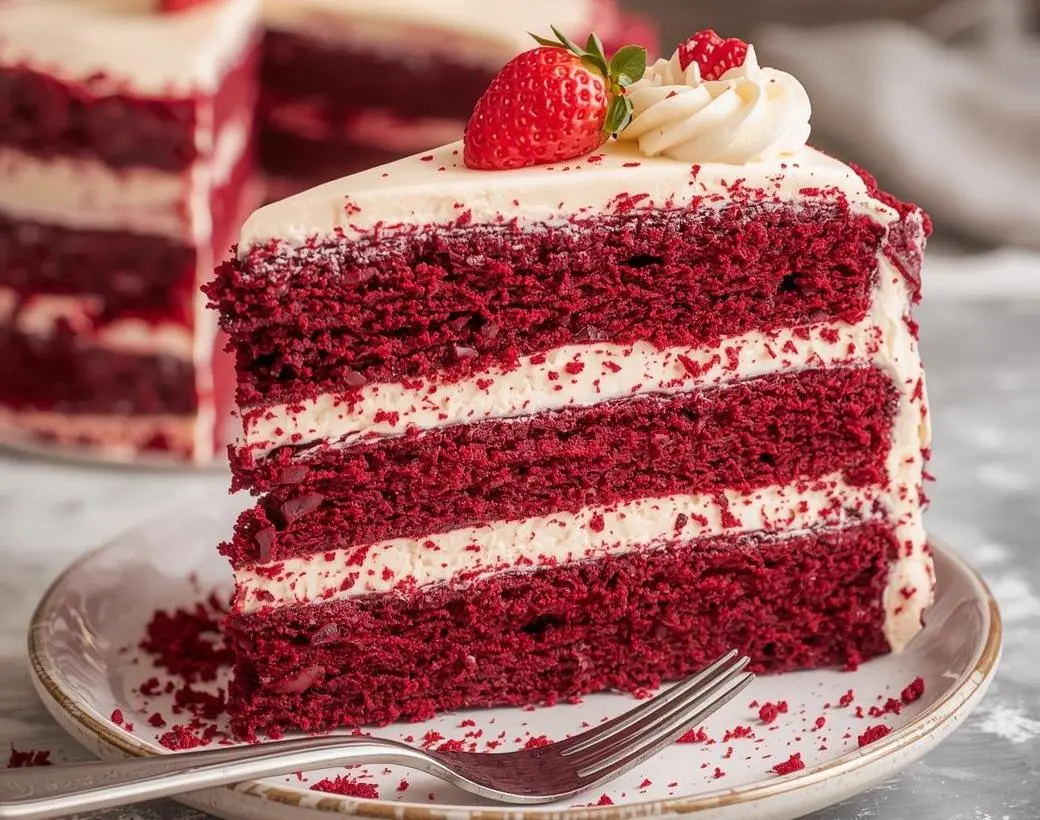
If there’s one dessert that defines indulgence, it’s the Red Velvet Cheesecake Layer Cake. Imagine soft, moist red velvet layers sandwiching a rich, creamy cheesecake, all covered in silky cream cheese frosting—it’s the kind of dessert that makes you stop after the first bite just to appreciate the perfection. This cake combines the best of two classic treats: the elegance of red velvet and the decadence of cheesecake, creating a show-stopping centerpiece for any celebration.
What makes this recipe truly special is how simple it is to prepare. You don’t need to be a professional baker to pull off this stunning dessert. With a few easy steps, you can create a bakery-quality cake right in your own kitchen. It’s perfect for birthdays, anniversaries, or simply when you want to impress your guests without spending hours baking.
This dessert reminds me of another reader favorite on the blog—our Strawberry Red Velvet Layer Cake, which delivers the same vibrant color and creamy texture, but with a fruity twist. However, the Red Velvet Cheesecake Layer Cake takes things up a notch with its velvety creaminess and indulgent depth of flavor. Get ready to fall in love—because this is more than a cake; it’s an experience worth savoring.
What is Red Velvet Cheesecake Layer Cake?
Ever wondered what makes Red Velvet Cheesecake Layer Cake so irresistible? It’s like two desserts in one—half cake, half cheesecake, and 100% bliss! The name alone makes you want to grab a fork. Why “red velvet”? Legend has it that the cocoa and buttermilk combo gives the cake its signature velvety texture and romantic red hue. Then someone had the genius idea to tuck a layer of cheesecake right in the middle—talk about a sweet upgrade!
As the saying goes, the way to a man’s heart is through his stomach, and this cake proves it. With its creamy filling and soft layers, it’s pure love in dessert form. Don’t just drool—go ahead and bake it!
Why You’ll Love This Red Velvet Cheesecake Layer Cake
There are plenty of reasons to adore this dessert, but here are the top three that make it truly unforgettable:
1. A Perfect Balance of Flavors
The tangy cream cheese frosting perfectly complements the rich cocoa flavor of the red velvet layers. The creamy cheesecake center adds a luxurious texture that melts in your mouth with every bite. It’s a symphony of flavors—sweet, tangy, and buttery—all in perfect harmony.
2. Homemade Goodness Saves You Money
Why pay bakery prices when you can make this stunning cake at home for a fraction of the cost? With basic pantry ingredients like cream cheese, flour, and cocoa powder, you can recreate this masterpiece without breaking the bank. Plus, it’s surprisingly simple to assemble with a few pro tips (coming up below!).
3. The Ultimate Party Showstopper
Whether it’s Valentine’s Day, a birthday, or a cozy family dinner, this Red Velvet Cheesecake Layer Cake steals the show every time. The striking red layers and creamy filling make it picture-perfect for your next celebration.
If you loved the Pumpkin Spice Gooey Cake for its fall vibes, this one’s the ultimate year-round indulgence. Give it a try—you’ll be amazed at how easily you can impress your guests!
How to Make Red Velvet Cheesecake Layer Cake
Quick Overview
This dessert might look fancy, but it’s easier than you think. With a total prep time of about 30 minutes and a baking time of 1 hour, it’s a manageable treat even for beginner bakers. The secret lies in baking the cheesecake layer first and letting it chill before sandwiching it between two soft red velvet cakes. Once frosted, you’ll have a dessert that’s creamy, moist, and absolutely irresistible.
Key Ingredients for Red Velvet Cheesecake Layer Cake
Here’s what you’ll need:
F or the Red Velvet Cake:
- 2 ½ cups all-purpose flour
- 1 tablespoon unsweetened cocoa powder
- 1 teaspoon baking soda
- ½ teaspoon salt
- 1 ½ cups sugar
- 1 cup buttermilk
- 1 cup vegetable oil
- 2 large eggs
- 2 teaspoons vanilla extract
- 1 teaspoon white vinegar
- 2 tablespoons red food coloring
For the Cheesecake Layer:
- 16 oz cream cheese (softened)
- ½ cup sugar
- 2 large eggs
- ½ teaspoon vanilla extract
- ¼ cup sour cream
For the Frosting:
- 16 oz cream cheese (softened)
- ½ cup unsalted butter
- 4 cups powdered sugar
- 1 teaspoon vanilla extract
Step-by-Step Instructions
- Make the Cheesecake Layer:
Preheat your oven to 325°F (165°C). Beat the cream cheese and sugar until smooth, then add eggs, vanilla, and sour cream. Pour into a springform pan and bake for 45 minutes. Cool completely, then refrigerate. - Bake the Red Velvet Layers:
In another bowl, whisk together dry ingredients. In a separate bowl, mix wet ingredients until smooth, then combine both. Pour into two greased 9-inch cake pans and bake at 350°F (175°C) for 30 minutes. Let cool completely. - Assemble the Cake:
Place one red velvet layer on a cake board, add the chilled cheesecake on top, then the second red velvet layer. Frost generously with cream cheese frosting. - Decorate:
Crumble leftover red velvet cake scraps or use red sprinkles to finish the look. - Chill and Serve:
Refrigerate for at least 2 hours before slicing. The result? Creamy, dreamy, and unforgettable!
What to Serve Red Velvet Cheesecake Layer Cake With
Pair your Red Velvet Cheesecake Layer Cake with:
- A hot cup of coffee or espresso for a rich contrast
- A glass of cold milk for a nostalgic treat
- Fresh strawberries or raspberries for a fruity balance
- A drizzle of chocolate or caramel sauce for extra indulgence
If you’re planning a dessert spread, it also pairs beautifully with Mini Caramel Peanut Cheesecakes or Strawberry Crunch Cheesecake Bites.
Top Tips for Perfecting Red Velvet Cheesecake Layer Cake
- Use room temperature ingredients. This ensures your batter blends smoothly.
- Don’t overbake the cheesecake. Slight jiggle means creamy texture!
- Chill before assembling. This keeps layers firm and easy to stack.
- Frosting too runny? Chill it for 15 minutes before spreading.
- Add a chocolate twist. Fold in mini chocolate chips for extra texture.
These little tricks make all the difference between a good cake and a truly unforgettable one.
Storing and Reheating Tips
- To Store: Keep the cake refrigerated in an airtight container for up to 5 days.
- To Freeze: Slice into portions, wrap tightly in plastic wrap, and freeze for up to 2 months.
- To Reheat: Allow slices to thaw overnight in the fridge. For a slightly warm bite, microwave for 10–15 seconds.
FAQs About Red Velvet Cheesecake Layer Cake
Q1: Can I make the Red Velvet Cheesecake Layer Cake ahead of time?
Yes! You can bake the cheesecake and cake layers a day in advance and assemble the next day for convenience.
Q2: What frosting works best for this cake?
Classic cream cheese frosting is the winner—it’s smooth, tangy, and perfectly complements the red velvet flavor.
Q3: Can I use store-bought cake mix?
Absolutely! For a time-saver, use a red velvet cake mix and focus your effort on the homemade cheesecake and frosting.
Q4: How do I prevent my cheesecake from cracking?
Bake it in a water bath and avoid overbaking—just until the center is slightly wobbly.
The Red Velvet Cheesecake Layer Cake isn’t just a dessert—it’s a celebration of flavor, texture, and pure joy. With its striking layers, creamy filling, and velvety crumb, it’s the perfect dessert to impress at any gathering or treat yourself on a cozy night in.
So grab your whisk, preheat that oven, and bring a little red velvet magic to your kitchen. Once you take that first bite, you’ll understand why this cake has everyone talking—and craving seconds!
1 thought on “Red Velvet Cheesecake Layer Cake: 3 Reasons You’ll Love This Dessert”