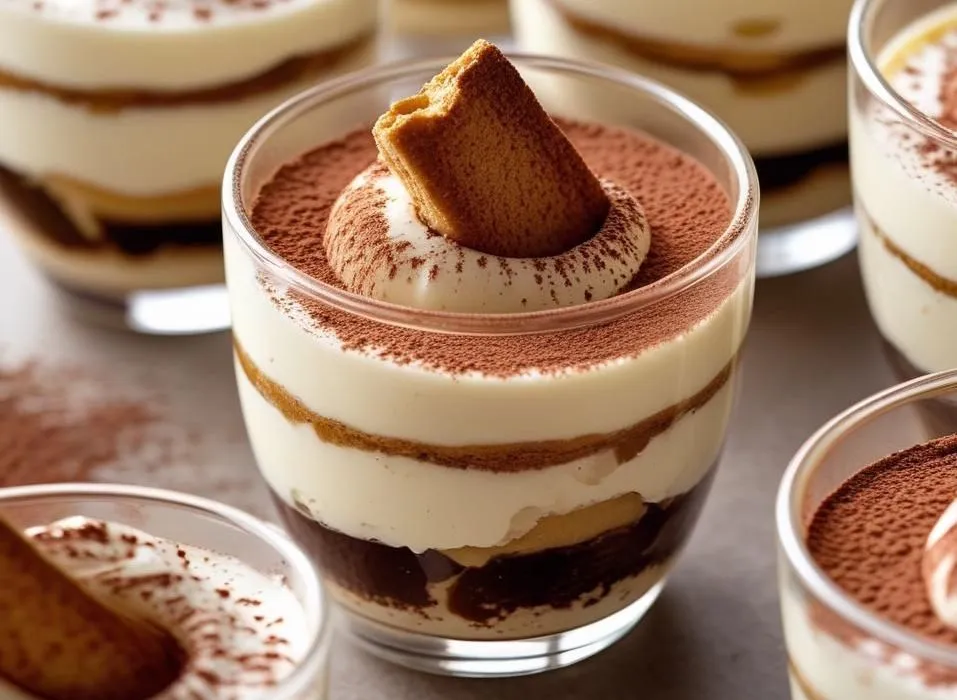
Creamy, dreamy, and downright irresistible—Mini Tiramisu Cups are the ultimate treat when you crave a dessert that feels elegant yet effortless. Imagine layers of soft coffee-soaked ladyfingers, fluffy mascarpone cream, and a dusting of cocoa, all served in adorable little cups that make every bite feel special. Doesn’t that sound like pure indulgence in every spoonful?
Here’s a fun fact: tiramisu means “pick me up” in Italian, thanks to its energizing combo of coffee and cocoa. And trust me, one taste of these mini cups, and you’ll feel exactly that—instantly uplifted. Unlike the full-sized cake, these single-serve portions are perfect for family dinners, parties, or even a midnight snack (no judgment here).
What makes this recipe even better is how quick and fuss-free it is. In under 30 minutes, you can whip up a batch without baking, making it one of the easiest desserts to impress with. Compared to my popular recipe for Strawberry Crunch Cheesecake Recipe And No-Bake Orange Creamsicle Cheesecake , these cups are faster, lighter, and more customizable. Both are crowd-pleasers, but tiramisu has that timeless Italian charm you just can’t resist.
So grab your spoon and let’s dive in—because once you try these creamy layers, you’ll be hooked!
What is Mini Tiramisu Cups?
Ever wondered why they’re called Mini Tiramisu Cups? Think of it as the classic Italian tiramisu—but shrunk into individual dessert cups for maximum cuteness and zero sharing issues. After all, who really wants to share dessert, right? The name is pretty straightforward, but the fun lies in the bite-sized joy they bring.
Some people say, “the way to a man’s heart is through his stomach.” Well, I’d argue the way to anyone’s heart is through a spoonful of mascarpone cream and coffee-soaked goodness. Picture this: no messy slicing, no worries about presentation—just grab a cup and dig in.
These little wonders are proof that good things truly come in small packages. Ready to experience the magic? Let’s get mixing!
Why You’ll Love This Mini Tiramisu Cups Recipe
There are so many reasons these Mini Tiramisu Cups will win you over, but here are the top three:
- The Creamy Highlight
Every spoonful offers a heavenly mix of velvety mascarpone cream and bold coffee flavors. The layers are perfectly balanced, giving you that melt-in-your-mouth experience. - Cost-Saving at Home
Why spend a small fortune at a fancy café when you can recreate this luxury dessert in your kitchen? With simple ingredients, you’ll make restaurant-quality tiramisu without the price tag. - Flavorful Toppings
Classic cocoa powder is just the beginning. Add shaved chocolate, crushed biscotti, or even a splash of liqueur for an extra twist. Each cup is customizable to your taste.
If you loved my No-Bake Oreo Cheesecake, these tiramisu cups are another no-bake favorite that’s just as easy but with an elegant Italian flair. Don’t wait—try this recipe today and wow your family!
How to Make Mini Tiramisu Cups
Quick Overview
This recipe is all about simplicity. In just 25–30 minutes, you’ll have creamy, layered dessert cups that taste like they came from an Italian café. No baking required, minimal cleanup, and guaranteed to impress.
Key Ingredients for Mini Tiramisu Cups
- 1 cup strong brewed coffee, cooled
- 2 tablespoons coffee liqueur (optional)
- 16–20 ladyfinger cookies
- 1 cup mascarpone cheese
- 1 cup heavy whipping cream
- 1/3 cup granulated sugar
- 1 teaspoon vanilla extract
- 2 tablespoons unsweetened cocoa powder (for dusting)
- Shaved chocolate or cocoa nibs (optional, for garnish)
Step-by-Step Instructions
- Brew and Cool Coffee
Start by brewing a strong cup of coffee and let it cool. For extra flavor, stir in the liqueur. - Whip the Cream
In a large bowl, whip the heavy cream with sugar and vanilla until soft peaks form. - Fold in Mascarpone
Gently fold mascarpone into the whipped cream until smooth and creamy. - Dip Ladyfingers
Briefly dip each ladyfinger into the cooled coffee mixture. Don’t soak them—just a quick dunk to avoid sogginess. - Layer the Cups
In small cups or jars, place a layer of dipped ladyfingers, followed by a layer of mascarpone cream. Repeat until the cups are filled. - Dust and Chill
Finish with a dusting of cocoa powder on top. Chill for at least 2–3 hours (or overnight for best flavor). - Serve and Enjoy
Garnish with shaved chocolate and serve chilled.
What to Serve Mini Tiramisu Cups With
- A hot cup of espresso or cappuccino
- Fresh berries like strawberries or raspberries
- A scoop of vanilla or hazelnut gelato
- Crunchy almond biscotti for added texture
These pairings balance the creamy richness and make the dessert even more indulgent.
Top Tips for Perfecting Mini Tiramisu Cups
- Use cold heavy cream for easier whipping.
- Don’t oversoak ladyfingers—quick dips are key.
- For a boozy twist, add Amaretto or Kahlua.
- Chill overnight for deeper flavor and firmer layers.
- Swap ladyfingers for sponge cake if unavailable.
Storing and Reheating Tips
- Refrigeration: Store in an airtight container for up to 3 days.
- Freezing: Wrap each cup tightly and freeze for up to 1 month. Thaw overnight in the fridge before serving.
- Reheating: No need! These are best served chilled.
FAQ About Mini Tiramisu Cups
Q: Can I make Mini Tiramisu Cups without alcohol?
Yes! Just skip the liqueur and use extra coffee or even hot cocoa.
Q: What can I use instead of ladyfingers?
Sponge cake or vanilla wafers work well as substitutes.
Q: How long do Mini Tiramisu Cups need to chill?
At least 2–3 hours, but overnight gives the best flavor and texture.
Q: Can I make this ahead for parties?
Absolutely! Prepare a day in advance and store in the fridge until ready to serve.
Mini Tiramisu Cups are the perfect blend of convenience, flavor, and elegance. With layers of coffee-kissed ladyfingers and velvety mascarpone cream, they’re guaranteed to impress family, friends, or even just yourself on a quiet night in. Affordable, customizable, and easy to make—this recipe proves that gourmet desserts don’t have to be complicated.
So next time you need a quick yet impressive treat, remember these creamy little cups of happiness. Try them today, and let every spoonful “pick you up” in the sweetest way possible!