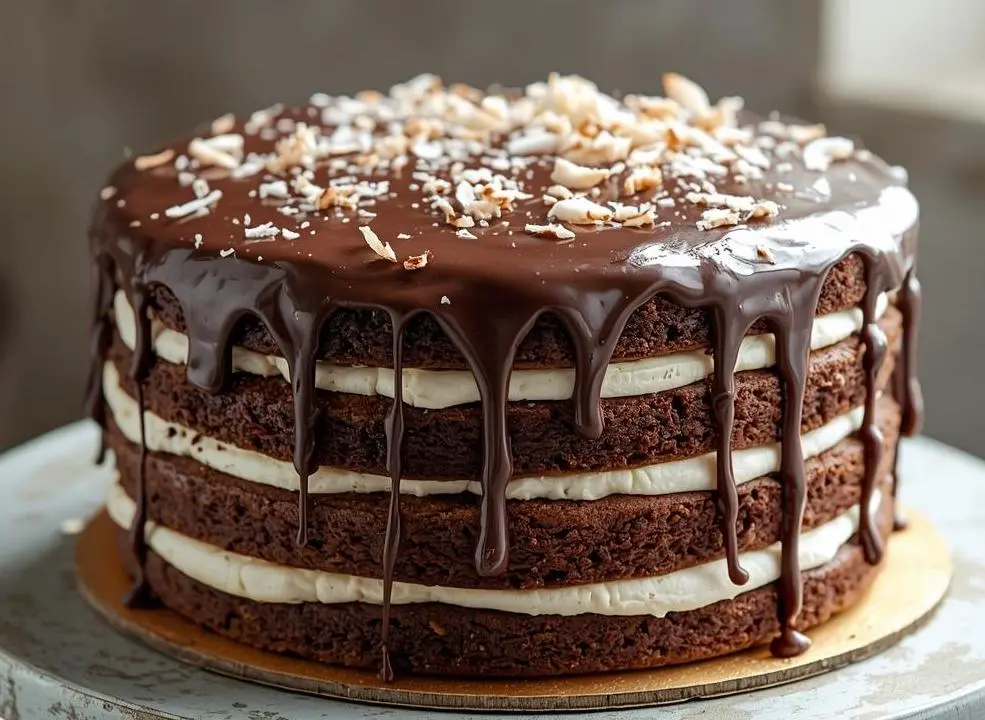
Craving a slice of paradise? This Chocolate Coconut Layer Cake is the ultimate tropical dessert that brings creamy chocolate richness and sweet coconut flavor together in one dreamy bite. Imagine soft, moist chocolate cake layers stacked with fluffy coconut cream and topped with silky ganache — it’s pure indulgence!
Fun fact: coconut and chocolate have been best friends in desserts for decades — from classic candy bars to fancy cakes like this one. But here’s the twist: while this recipe looks impressive, it’s surprisingly easy to make. With just a few simple steps, you can create a bakery-style cake right in your kitchen without spending hours mixing or decorating.
What makes this cake special is its balance of flavors — not too rich, not too sweet — just the perfect tropical harmony. It’s a family-friendly dessert that works for birthdays, holidays, or even casual weekend treats. If you loved my Black Forest Cheesecake Bliss, then you’re going to fall head over heels for this recipe. Both share that same rich, layered charm, but this one has a tropical twist that makes every bite feel like a sunny getaway.
Ready to bake happiness? Let’s dive into this irresistible creation!
What Is Chocolate Coconut Layer Cake?
So, what’s behind the mouthwatering name Chocolate Coconut Layer Cake? Well, it’s exactly what it sounds like — chocolatey layers of cake wrapped around a creamy coconut filling that feels like a tropical vacation in dessert form! Ever wondered why coconut and chocolate seem inseparable? It’s because together they strike the perfect balance between rich and refreshing — like yin and yang, but tastier!
Legend has it that this cake was inspired by bakers who wanted to bring a bit of the tropics into classic chocolate desserts. After all, as the old saying goes, “The way to a man’s heart is through his stomach.” And once you serve this cake, you’ll have everyone swooning after the first bite.
So go ahead — grab your whisk, preheat that oven, and get ready to fall in love with this tropical chocolate beauty!
Why You’ll Love This Chocolate Coconut Layer Cake
There are endless reasons to adore this Chocolate Coconut Layer Cake, but let’s focus on the top three that make it unforgettable:
- A Tropical Chocolate Dream
This cake combines the deep, rich flavor of cocoa with the delicate sweetness of coconut cream and shredded coconut. Each forkful feels like a trip to a tropical island — smooth, moist, and heavenly. - Save Money, Skip the Bakery
Why spend a fortune on fancy bakery cakes when you can whip up this stunner at home? With simple pantry ingredients and no special tools, you’ll save money and get bragging rights for making it from scratch. - Coconut Topping That Steals the Show
The toasted coconut flakes on top add the perfect crunch to the creamy layers beneath. And if you drizzle a touch of warm chocolate ganache over them? Pure perfection.
If you’re a fan of my Decadent Tiramisu Truffles, this one takes things up a notch — it’s like your favorite chocolate cake met a tropical breeze. Don’t wait — your kitchen deserves this sweet escape!
How to Make Chocolate Coconut Layer Cake
Quick Overview
Making this Chocolate Coconut Layer Cake is easier than it looks. With just 5 simple steps, you’ll create a moist chocolate cake layered with a creamy coconut filling and rich chocolate ganache. The entire process takes about 1 hour of prep and bake time, and the result is a showstopping dessert that’ll make you look like a pro baker!
Key Ingredients for Chocolate Coconut Layer Cake
- 2 cups all-purpose flour
- 1 ½ cups granulated sugar
- ¾ cup unsweetened cocoa powder
- 2 tsp baking powder
- 1 tsp baking soda
- ½ tsp salt
- 1 cup buttermilk (or milk + 1 tbsp vinegar)
- ½ cup vegetable oil
- 2 large eggs
- 1 tsp vanilla extract
- 1 cup hot water or brewed coffee (for extra richness)
- Coconut Filling:
- 1 cup heavy cream
- 1 ½ cups shredded coconut
- ½ cup powdered sugar
- 1 tsp coconut extract
- Chocolate Ganache:
- 1 cup semi-sweet chocolate chips
- ½ cup heavy cream
- 1 tbsp butter
Step-by-Step Instructions
Step 1: Prepare the Batter
Preheat the oven to 350°F (175°C). Grease and line two 9-inch round cake pans with parchment paper. In a large bowl, mix flour, cocoa, sugar, baking powder, baking soda, and salt. Add eggs, oil, buttermilk, and vanilla. Whisk until smooth, then slowly stir in hot water or coffee — the batter will be thin, but that’s what makes the cake moist!
Step 2: Bake the Cakes
Divide the batter evenly between the pans. Bake for 30–35 minutes or until a toothpick inserted in the center comes out clean. Cool completely before assembling.
Step 3: Make the Coconut Filling
In a bowl, whip heavy cream until soft peaks form. Add powdered sugar, coconut extract, and shredded coconut. Fold gently — the result should be light, creamy, and full of tropical flavor.
Step 4: Assemble the Layers
Place one cake layer on a plate, spread a generous amount of coconut filling, then top with the second cake layer. Smooth any extra filling along the sides for that rustic, bakery-style look.
Step 5: Add Ganache and Garnish
Heat the heavy cream, pour it over chocolate chips, and stir until smooth. Spread over the cake, letting it drip naturally along the edges. Sprinkle toasted coconut flakes on top — and voilà, dessert perfection!
What to Serve Chocolate Coconut Layer Cake With
Pair this Chocolate Coconut Layer Cake with a few delicious sides and drinks for a complete dessert experience:
- A scoop of vanilla bean ice cream for an extra creamy contrast
- A warm cup of espresso or mocha latte for coffee lovers
- Fresh tropical fruit salad — pineapple and mango balance the sweetness perfectly
- A drizzle of caramel sauce if you’re feeling extra indulgent
This cake shines as a dessert centerpiece, but it’s equally perfect for birthdays, family dinners, or casual get-togethers.
Top Tips for Perfecting Chocolate Coconut Layer Cake
- Always use room temperature ingredients for even mixing.
- Add hot coffee instead of water — it enhances the chocolate flavor beautifully.
- Toast your coconut flakes for 3–5 minutes before adding them on top.
- Chill the cake before slicing for cleaner, more professional-looking layers.
- Want a lighter version? Swap heavy cream for whipped coconut cream.
Avoid overbaking — that’s the number one reason cakes turn dry. Trust your nose — when it smells heavenly, it’s usually done!
Storing and Reheating Tips
- Refrigeration: Store the cake covered in the fridge for up to 5 days.
- Freezing: Wrap slices individually and freeze for up to 3 months. Thaw overnight in the fridge before serving.
- Reheating: For that fresh-out-of-the-oven feel, microwave a slice for 10–15 seconds. It’ll soften the ganache and make the coconut filling taste freshly whipped again.
Pro tip: If you’re planning ahead for a celebration, bake the layers in advance and freeze them — just assemble the day before your event!
FAQ About Chocolate Coconut Layer Cake
Q1: Can I use coconut milk instead of heavy cream?
Yes! Coconut milk adds extra flavor and keeps the filling dairy-free.
Q2: Can I make this cake gluten-free?
Absolutely. Substitute with a 1:1 gluten-free flour blend.
Q3: How do I make the cake even richer?
Use dark cocoa powder and top with extra ganache for a truly decadent finish.
Q4: What’s the best way to toast coconut?
Spread flakes on a baking sheet and toast at 325°F (160°C) for 5 minutes, stirring once.
This Chocolate Coconut Layer Cake is more than just dessert — it’s a bite of tropical bliss that turns any occasion into a celebration. With its rich chocolate layers, creamy coconut filling, and silky ganache topping, it’s the kind of cake everyone remembers.
Whether you’re baking for family, friends, or just because you deserve a treat, this recipe delivers every time. So, preheat your oven, grab your mixing bowl, and treat yourself to a slice of paradise today!
6 thoughts on “Chocolate Coconut Layer Cake: 5 Steps to Tropical Bliss”